Reflective Road Studs: Types, Installation Spacing, and Critical Safety Benefits
In the quiet of the night, during a sudden downpour, or in the thickest of fog, what guides a driver safely along a winding road? The answer often lies beneath the vehicle's headlights: a series of small, brilliantly shining objects known as **reflective road studs**. These simple yet powerful devices are an unsung hero of **road safety**, providing a clear, continuous guide for motorists in low-visibility conditions. They are a critical component of modern traffic management, acting as a lifeline when painted lines disappear from view. Often colloquially referred to as "**cat eyes**," due to their resemblance to a feline's glowing eyes in the dark, these markers have evolved significantly since their invention. This comprehensive guide will explore the different **types of reflective road studs**, delve into the vital standards of **installation spacing**, and highlight why correct placement is non-negotiable for saving lives on our roads.
Understanding the Different Types of Reflective Road Studs
The world of **road stud types** is more diverse than you might think. While they all serve a similar purpose, their materials, durability, and applications vary widely. Choosing the right stud for the job is crucial for long-term performance and safety. Here's a breakdown of the most common types:
- Composition: Typically made from high-impact ABS plastic or polycarbonate.
- Durability & Application: These are the most lightweight and cost-effective option. They are generally suitable for low-to-medium traffic areas, such as residential streets, parking lots, and bicycle paths. While they are less durable than their metal counterparts, modern designs are engineered to be highly resistant to UV rays and impact.
- Advantages: Easy to install, available in various colors, and highly affordable.
2. Aluminum and Cast Iron Road Studs
- Composition: Constructed from a solid aluminum or cast iron body with embedded reflective lenses.
- Durability & Application: These studs are built for strength and longevity. Their robust metallic body can withstand heavy vehicular traffic, including trucks and buses, making them ideal for highways, main roads, and high-volume intersections. The heavy-duty design ensures they remain firmly in place under constant stress.
- Advantages: Extremely durable, high impact resistance, excellent longevity, and suitable for all weather conditions.
3. Solar-Powered LED Road Studs
- Composition: A durable casing (often aluminum or plastic) housing a solar panel, a battery or supercapacitor, and high-intensity LED lights.
- Durability & Application: Considered the future of **road safety**, these studs don't require external light to function. They charge during the day and automatically illuminate at night, providing up to 800-1000 meters of visibility, far exceeding traditional reflective studs. They are used on highways, sharp curves, tunnels, and areas prone to fog.
- Advantages: Superior visibility, self-sufficient power, can be installed in areas with no street lighting, and active lighting is highly effective in adverse weather.
- Learn More: Learn more about the technology behind solar road studs here.
4. Glass Road Studs
- Composition: Crafted from tempered glass, often with a spherical shape.
- Durability & Application: These unique studs are highly durable and offer 360-degree reflection. Their solid glass construction makes them resistant to heavy loads (up to 80 tons) and chemical corrosion. They are most effective on highways, tunnels, and roundabouts where all-around visibility is needed.
- Advantages: Unmatched 360-degree visibility, aesthetically pleasing, and highly resistant to wear and tear.
5. Ceramic Road Studs
- Composition: Made from a dense ceramic material with a glazed finish.
- Durability & Application: Similar to glass studs, ceramic studs are highly durable and are designed for both visual guidance and as a tactile warning for drivers. They are often used in areas where traffic is slow or where a different type of marker is required for lane delineation.
- Advantages: Extremely hard, resistant to abrasion, and available in bright, fade-proof colors.
The Science of Installation Spacing: Why Every Meter Matters
Choosing the right **road stud types** is only half the battle. The true genius of these markers lies in their strategic **installation spacing**. The distance between each stud is not random; it's a carefully calculated standard designed to create a continuous, guiding line of light for drivers. Incorrect spacing can lead to gaps in visibility or an overwhelming, confusing pattern of lights, both of which compromise **road safety**.
General guidelines for **installation spacing** are as follows:
- Urban Roads & City Streets: Spacing is typically closer, around 5 to 10 meters (16 to 33 feet) apart. This helps drivers navigate complex intersections, turns, and lane changes in a busy urban environment.
- Highways & Main Arterials: On open, high-speed roads, the spacing is wider, typically 10 to 15 meters (33 to 50 feet) apart. This ensures that the markers appear as a solid line of light to a fast-moving driver.
- Curves & Bends: On curves, especially sharp ones, the spacing is reduced to provide more immediate feedback to the driver about the road’s direction. Spacing can be as close as 2 to 4 meters (6 to 13 feet) on tight bends to enhance driver confidence.
- Tunnels & Low-Visibility Areas: In tunnels, where natural light is absent and air quality can be poor, reflective or solar studs are essential. Spacing is often tighter, and they are sometimes placed in an alternating or staggered pattern to maximize visibility and avoid a hypnotic effect.
.jpg)
The Advantages of Correct Spacing for Road Safety
Proper **installation spacing** provides numerous safety benefits:
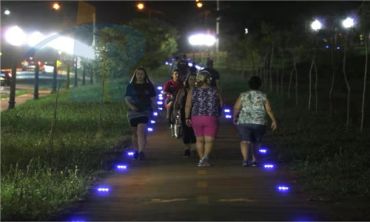
- Enhanced Visibility: A correctly spaced line of **cat eyes** creates a "runway" effect, allowing drivers to see the road ahead clearly, even in the darkest or most challenging conditions.
- Improved Driver Guidance: The pattern of studs provides a constant visual cue, helping drivers stay in their lane and navigate twists and turns with confidence.
- Reduced Accidents: Studies have shown that the installation of **reflective road studs** and correct spacing can significantly reduce nighttime accidents, particularly in rural or unlit areas.
- Cost-Effective Maintenance: Proper spacing ensures maximum performance and reduces the need for frequent replacements, as each stud is placed in the most optimal position to guide traffic.
Step-by-Step Installation Guide
Installing **reflective road studs** is a job that requires precision and the right materials to ensure long-term performance. Here is a simplified guide to the process:
- Surface Preparation: The road surface must be clean, dry, and free of dirt, oil, or debris. Use a broom, a blower, or a pressure washer to thoroughly clean the area where the studs will be placed.
- Marking & Positioning: Use chalk or a paint marker to accurately mark the precise locations for each stud, based on the required **installation spacing** standards for that specific road type.
- Applying the Adhesive: Apply a professional-grade, two-part epoxy or bitumen-based adhesive to the bottom of the stud. Ensure the adhesive is applied evenly to create a strong, durable bond with the road surface.
- Fixing the Stud: Firmly press the stud onto the marked spot, ensuring the reflective lenses are facing the direction of oncoming traffic. Apply firm, even pressure to squeeze out any excess adhesive.
- Curing: Allow the adhesive to cure for the recommended time (typically 20-30 minutes for a quick-set epoxy, but check the manufacturer’s instructions). Do not allow traffic over the studs until the adhesive is fully cured.
For some heavy-duty studs, especially cast iron models, mechanical fixing (e.g., drilling and pinning) may also be used in addition to or instead of adhesive.
Frequently Asked Questions About Reflective Road Studs
Q1: What do the different colors of road studs mean?
A: The colors have specific meanings for **road safety**. White studs mark the center or lane lines, red studs mark the left edge of the road, amber/yellow studs mark the right edge, and green studs indicate entrances to a lay-by or parking area. Blue studs are often used for emergency access points, such as fire hydrant locations.
Q2: How long do reflective road studs last?
A: The lifespan varies significantly based on the **road stud types** and traffic volume. Plastic studs may last 2-5 years, while durable aluminum or cast iron studs can last 10-15 years or more. Solar-powered studs typically have a battery life of 5-8 years before requiring replacement, though the casing can last longer.
Q3: Are they really called "cat eyes"?
A: Yes, the term "**cat eyes**" is the popular name for the original invention by Percy Shaw. While it now refers to a specific type with a rubber housing, it is a common term used to describe all **reflective road studs** and is widely recognized in the industry and by the public.
A Final Thought on Safety
From simple plastic markers to advanced solar-powered beacons, **reflective road studs** are a testament to the fact that small innovations can have a monumental impact on **road safety**. Their strategic use, with careful attention to **installation spacing**, transforms dark roads into safe, guided pathways for drivers. Understanding the different **road stud types** and their applications is essential for creating safer driving environments for everyone. For more information or a professional consultation on the right road safety solutions for your project, please contact us today.


.jpg)